Categories
Windows Windows Server 2022

Configure SMTP Server on Microsoft Windows Server 2022

Despite being deprecated for over a decade, there is still a number of reasons why one might want to use the Simple Mail Transfer Protocol Service in Windows Server. One that specifically comes to mind are devices, such as printers, that do not support some authentication protocols on modern servers.

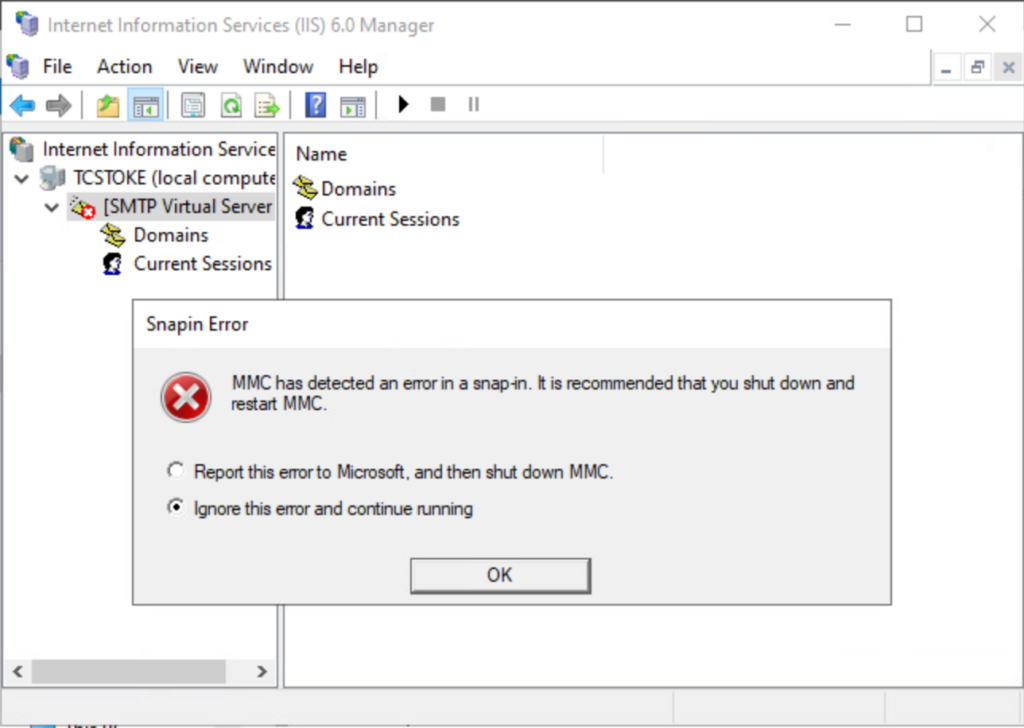
Unfortunately, upon installing the SMTP service in Windows 2022, the service cannot be configured using the MMC for Internet Information Services 6.0. You might see a ‘Snapin Error’ prompting to report the error or ignore and continue. Neither option will advance the configuration of the service.

Error message presented when attempting to edit properties of the SMTP virtual server

Resolving the Problem

The problem is a bad configuration file installed by default. This can be rectified with the following steps.

  1. Stop SMTPSVC and IISADMIN services. They are displayed as Simple Mail Transfer Protocol (SMTP) and IIS Admin Service respectively.
  2. Open “C:\Windows\System32\inetsrv\MetaBase.xml” for editing.
  3. Find: Location =”/LM/SmtpSvc/1″
  4. Attributes for that XML element are listed alphabetically. Add: RelayIpList=””
  5. Save the MetaBase.xml file.
  6. Start SMTPSVC and IISADMIN services.
  7. Open Internet Information Services (IIS) 6.0 Manager from Administrative Tools. Right-click [SMTP Virtual Server #1] and select ‘Properties…’.
  8. Configure the service as you need.

Services Not Listed

If you do not see the SMTP service listed, I wrote a post some time ago about modifying the SMTP service using the terminal.

Categories
Kata

Kata – Revolver Roulette

Here’s a little exercise with a violent setting. It might be worth remembering if you’re unfortunate enough to be in a situation like this:

A masked man puts two bullets into adjacent chambers of a six shooter revolver. The masked man aims the gun at you and pulls the trigger.

<click>…phew!

The chamber advances by one and the masked man prepares to fire once again. He offers you the opportunity to roll the barrel before firing again. Should you take the masked man up on his offer?

Assume you survive the second shot at this point.

Now suppose he is to fire two more times for a total of four shots.

Do you accept a spin of the chamber prior to third shot?

How about a spin of the chamber prior to the fourth?

What are your chances of survival after surviving the first shot?

Categories
Personal

My Children and Social Media

I don’t generally post photographs of my children on social media or other publicly visible web sites and services. I have been asked why I do not (not many times, it’s not that urgent). However, the question got me thinking about it. So here is an offering in the public domain; make of it what you will.

Categories
Windows

Create a PFX certificate file using OpenSSL

I usually work with Linux-based operating systems for web development. However, my company does run a couple of Microsoft Windows(R) servers for internal financial systems. When securing connections to Windows services, it is often useful to have certificates available in PFX format.

To convert a private key, certificate, and (optionally) any trusted chains; you will need the following:

  • The private key file.
  • A PEM containing the corresponding certificate.
  • Additional trust chains to be included (may also be included in the PEM in bullet 2).
  • OpenSSL (I tested this with the Mac OS X High Sierra – LibreSSL 2.2.7).

Place all of the files in your home directory and start a terminal session. Execute the following command, replacing the file names where appropriate for the files you have prepared:

openssl pkcs12 -export -out trevweb.pfx -inkey trevweb.key -in trevweb.crt -certfile trust-chain.crt

Assuming everything executed correctly, you should now have a ‘trevweb.pfx’ file located in your home directory ready to be imported easily by Windows services. A PFX, or I think more accurately a PKCS #12, file is a binary file format that may contain multiple certificate bundles.

Categories
Windows Windows Server 2016

SMTP Service Auto-Start on Windows Server 2016

I recently installed the SMTP (Simple Mail Transfer Protocol) feature to Windows Server 2016. Everything seemed fine until I discovered that the SMTP service does not start automatically on system re-boot. Furthermore, the service is not listed under the Services management snap-in. Operating the SMTP service via the IIS Manager 6.0 manager manually works just fine.

This situation can be remedied at the command prompt using ‘sc’. i.e.

sc config smtpsvc start= auto

Note that there is a space between the parameter ‘start=’ and the value ‘auto’. This is intentional and all name/value pairs need to be separated like this.

All being well, a confirmation will be displayed:

[SC] ChangeServiceConfig SUCCESS

This does not solve the problem of the SMTP not being listed under the services management snap-in. If anyone can shed any light on that, please leave a comment.

I do know that the display name for the service is ‘Simple Mail Transfer Protocol (SMTP)’. This can be confirmed by executing:

sc getdisplayname smtpsvc
Categories
Personal

Deskspace Project

I was recently reminded of Deskspace Project this month at Staffs Web Meet-up. I love this idea and think it is worth spreading; hence this blog post.

Deskspace Project is a free-of-charge hot desk facility for new entrepreneurs. This is a great opportunity for those looking to start a new business and want a base of operations in the fledgling months; providing a modern office environment with tea, coffee and wireless Internet access.

TopCashback provides this facility and, amongst other things, sponsors the excellent Staffs Web Meet-up (which I try not to miss).

Categories
Personal

SSLing All of My Things

I have been thinking about activating HTTPS/SSL on all my web things for a while now. I was procrastinating for two reasons; avoiding expenditure and not wanting to mess about with configurations.

Enter Let’s Encrypt and the emergence of widely available and free SSL/TLS certificates. I tend to use Apache on Ubuntu/Debian and often use Plesk for managing some small virtual private servers. Let’s Encrypt provides easy and simple means for a person like me to automatically install SSL certificates; there’s even a Plesk plugin.

My ISP, OVH, has even taken the trouble to support Let’s Encrypt as a sponsor and enable SSL hosting, free of charge, with all of their hosting packages. I think this is a great move.

So, with my reasons for procrastinating gone, it’s about time I get to work! I’ve started with this blog and I hope you’re viewing this post securely!

Categories
Personal

Merry Christmas 2016!

It has been a while since I last posted. I’m sure you’ll all be glad to know that I’m still alive and bothering people.

In the Brexit spirit, I wanted to tell everyone that Christmas means Christmas! I’m committed to making it work for everyone. I’ll let you know my Christmas plans by late March; they might be coloured.

Seriously though, I’ll be out of my hole again soon. The three or four of you that have missed my posts were very kind to let me know!

Categories
Ubuntu

SSH Authentication With Keys

I recently posted about disabling the root user on Ubuntu. A seemingly obvious next step might be to avoid having to use passwords altogether. I use SSH keys to monitor my servers. Non-Exhaustive benefits (assuming that you keep your keys safe):

  • SSH keys are a lot less likely to be brute forced than a password.
  • Password authentication can be disabled if appropriate.
  • Easier to setup scripts that connect to other servers E.g. rsync backup without supplying authentication credentials.
  • Allow multiple people to share access to a system user without sharing the password.
  • Remove access for an individual without altering the system configuration.

Generating a Key

Note: If you already have a key pair that you wish to use, skip to Configure a Remote User. You might have created a key already that you wish to retain, perhaps for a code repository or other service using SSH.

The key I refer to in the title is actually a key pair; public and private components. The key pair will be generated on the client; probably the computer you’re using (*nix based systems). I used my iMac for this post.

Trevs-iMac:~ trevor$ ssh-keygen -t rsa

You will likely be prompted for a file location to save your key pair. The default will likely be offered to you as the path .ssh/id_rsa within your home directory.

Generating public/private rsa key pair.
Enter file in which to save the key (/Users/trevor/.ssh/id_rsa):

Upon entering your own file name or accepting the default (enter without input), you will be given the opportunity to enter a passphrase.

Enter passphrase (empty for no passphrase):

A passphrase is optional; there are benefits to having one. Chiefly, if the key is compromised and in the hands of another it will be ineffective until the passphrase is also known. However, it does mean that you will need to type it when invoking the key for authentication; making unattended use less convenient.

Regardless of your decision concerning passphrase, your files will be located in the path you supplied; with the public component having the same name with a .pub extension.

You now have a key pair to use for authentication on a remote system.

Configure a Remote User

Using the key pair for the purposes of authentication is a straightforward exercise. You should keep your private key, private. The public key (contained in the file created with the .pub extension) is all that is required for the remote system.

If you are using a Linux based OS (OS X El Capitan does not have this command for some reason) you will likely have a terminal command that will achieve the results in one hit:

ssh-copy-id trevor@host.domain.co.uk

Where trevor is to be replaced with the user on the remote system.

Alternatively, log into the remote system and append the contents of your public key file into ~/.ssh/authorized_keys.

You can store as many public keys in this file as you wish, simply append them to the file.

Test the Configuration

You should now be able to test the connection from your client terminal. Simply enter (replacing trevor with your username):

Trevs-iMac:~ trevor$ ssh trevor@host.domain.co.uk

If you opted to use a passphrase, you will be prompted to enter it. You should be able to establish a secure connection to your remote system without requiring input of additional credentials.

Conclusion

Connecting via SSH with an authorised key offers some advantages. It keeps from having to type passwords into terminals or other input mechanisms. Password authentication could be disabled entirely, only allowing connections authenticated with public/private key.

Writing your own backup scripts on your development/hobby servers is simple and will not require a password to be stored or entered.

Consider using a passphrase if you cannot adequately secure your private key. You will gain more security at the expense of convenience.

Acknowledgement

SSH featured image.
Categories
Education Personal

Code Club at Bentilee Library

I’m co-running a new Code Club at Bentilee Library with Samuel Freeman. It is the first Code Club to run in a Stoke-on-Trent library. It has run for three weeks and it has been excellent. The kids have been learning to program games using Scratch. The Sentinel stopped by last week to see what was going on and wrote a great article.

Samuel Freeman setting up the Library systems for Code Club
Samuel Freeman setting up Bentilee Library systems for Code Club.