JavaScript Include, Part 3

In this third and (as seems most likely at the moment) final article about developing a JavaScript ‘include’ facility, I’ll address the provision of ‘include-once’ functionality. If you’ve not read the previous two articles, or you wish to refresh your memory, my first JavaScript ‘include’ article discussed the basic need for an ‘include’ feature, and offered a reasonable first stab at an implementation. It also outlined two key shortcomings of this first attempt. The first shortcoming, the proper handling of relative paths to included files, is dealt with in my second JavaScript ‘include’ article; the second issue of how to deal with the same files being included more than once, is presented here.

Disclaimer

Please see my JavaScript disclaimer in the first JavaScript ‘include’ article. It still applies, and constructive comments are welcome on any gaffes or oversights.

What Is Include-Once?

In addition to an include facility, many languages offer the ability to be able to ‘include-once’. Where source files are variously dependent upon other files and upon each other, it’s easy to see how the same files could be included over and over. Being able to include-once would prevent such multiple inclusions of the same file by automatically only including each file the first time it’s included.

From the caller’s point of view, using include-once is syntactically very similar to using a regular include, e.g.:

includeOnce("usefulLib.js");
usefulFn();

In this example, the ‘usefulLib.js’ file (which presumably includes the implementation of the ‘usefulFn()’ function) would only be included if it hadn’t previously been included before (irrespective of whether the previous inclusion was performed using ‘include()’ or ‘includeOnce()’).

Even with ‘includeOnce()’ available, it would still be possible to force an include to take place. In the following code snippet, both ‘someCode1.js’ and ‘someCode2.js’ would be included twice:

include("someCode1.js");

includeOnce("someCode2.js");
include("someCode2.js"); // Only 'includeOnce()' checks for previous inclusion.

Although for most purposes (or so it seems to me), ‘includeOnce()’ would be more useful than ‘include()’, a regular non-exclusive inclusion may still have its place. For example, you may want to include a chunk of JavaScript that generates dynamic page content in situ (using ‘document.write()’, say). If you want this dynamic content to appear more than once in the page, then it may be necessary to force the multiple inclusion of such code snippets. Ideally, then, both ‘include()’ and ‘includeOnce()’ would be available.

Implementing Include-Once

In order for the ‘include’ facility to be able to establish whether a file has previously been included, we need some means to uniquely identify files. Clearly, filename alone isn’t sufficient because different files could have the same filenames (as long as they’re within different directories). Although it might be tricky to think of a circumstance where a developer would have such an arrangement, it is possible in principle, therefore we need to make sure our ‘include-once’ feature won’t be wrong-footed by it.

Perhaps what we need is to use full pathnames (or even full URLs) to identify files. In [part 2 of this article series], better handling of file pathnames was introduced, but relative paths alone won’t cut it. If, for example, two files in different directories both include the same third file, they could refer to it using relative paths that won’t necessarily match exactly. In other words, although we’d have the same file being included twice, a casual glance at the relative paths alone might lead us to believe that two different files are being included.

Whenever an ‘include()’ or an ‘includeOnce()’ is requested, then, we’ll need to do a fair bit of processing on the supplied pathname to establish the full URL of the included file.

There are two parts to this process. Firstly, we need to take a look at the include file path we’ve been given and prefix it with whatever is required to make it into a full, absolute URL. At one extreme, this could involve no modification (in the case where we were supplied with a full URL anyway); at the other, we could be adding everything but the filename. Secondly, we need to make sure that the full URL we have doesn’t contain any ‘.’ or ‘..’ (i.e., ‘this directory’ or ‘parent directory’) parts, because this too could make two references to the same file look different from each other.

Although the process of converting (what could be) a relative include path into a full, absolute URL isn’t the proverbial rocket science, it is still a bit fiddly, and, requires more lines of code than it feels it deserves. I’ve implemented the process via two functions: ‘getRealUrl()’ that takes a full URL (i.e., one that begins with ‘http://’ and includes a domain) and parses out the ‘.’ and ‘..’; and ‘getAlreadyIncludedKey()’ that makes sure the include path is a full URL before calling upon ‘getRealUrl()’ to make sure there are no ‘.’ and ‘..’ parts.

So, ‘getAlreadyIncludedKey()’ provides us with a unique reference to a file to be included, thus giving us a means to recognise whether we’ve been asked to include a supplied file before. As the function’s name suggests, we can then use this reference as a key into a JavaScript object, for which I’ll use a global variable called ‘_alreadyIncluded’.

Using a file’s full URL as a key, we can then make a note of every file that’s included (using either ‘include()’ or ‘includeOnce()’) and automatically refrain from including it as necessary if it has been included before (using ‘includeOnce()’).

The Final Include Code in Full

It’s taken quite an effort to produce as comprehensive an ‘include’ facility as a modern language ought to offer, but here’s the full implementation in all its glory (I toyed with the idea of only including in full those extra bits required for ‘include-once’ support, but thought it would be more convenient to work with if anyone was actually tempted to try using this new facility):

var _includePath = "";
var _alreadyIncluded = {};

// Essentially 'new XMLHttpRequest()' but safer.
function newXmlHttpRequestObject()
{
    try
    {
        if (window.XMLHttpRequest)
        {
            return new XMLHttpRequest();
        }
        // Ancient version of IE (5 or 6)?
        else if (window.ActiveXObject)
        {
            return new ActiveXObject("Microsoft.XMLHTTP");
        }

        throw new Error("XMLHttpRequest or equivalent not available");
    }
    catch (e)
    {
        throw e;
    }
}

// Synchronous file read. Should be avoided for remote URLs.
function getUrlContentsSynch(url)
{
    try
    {
        var xmlHttpReq = newXmlHttpRequestObject();
        xmlHttpReq.open("GET", url, false); // 'false': synchronous.
        xmlHttpReq.send(null);

        if (xmlHttpReq.status == 200)
        {
            return xmlHttpReq.responseText;
        }

        throw new Error("Failed to get URL contents");
    }
    catch (e)
    {
        throw e;
    }
}

function include(filePath)
{
    includeMain(filePath, false);
}

function includeOnce(filePath)
{
    includeMain(filePath, true);
}

function includeMain(filePath, once)
{
    // Keep a safe copy of the current include path.
    var includePathPrevious = _includePath;

    if (isAbsolutePath(filePath) == true)
    {
        var actualPath = filePath;
        // Absolute paths replace.
        _includePath = getAllButFilename(filePath);
    }
    else
    {
        var actualPath = _includePath + filePath;
        // Relative paths combine.
        _includePath += getAllButFilename(filePath);
    }

    var alreadyIncludedKey = getAlreadyIncludedKey(actualPath);

    if (once == false || _alreadyIncluded.alreadyIncludedKey == undefined)
    {
        var headElement = document.getElementsByTagName("head")[0];
        var newScriptElement = document.createElement("script");

        newScriptElement.type = "text/javascript";
        newScriptElement.text = getUrlContentsSynch(actualPath);
        headElement.appendChild(newScriptElement);
        _alreadyIncluded.alreadyIncludedKey = true;
    }

    // Restore the include path safe copy.
    _includePath = includePathPrevious;
}

function isAbsolutePath(filePath)
{
    if (filePath.substr(0, 1) == "/" || filePath.substr(0, 7) == "http://")
    {
        return true;
    }

    return false;
}

// Strips the filename from a path, yielding everything else.
function getAllButFilename(filePath)
{
    return filePath.substr(0, filePath.lastIndexOf("/") + 1);
}

// Yields a full, real URL to be used as a file's include key.
function getAlreadyIncludedKey(filePath)
{
    if (filePath.substr(0, 7) == "http://") // Full URL?
    {
        return getRealUrl(filePath);
    }

    if (filePath.substr(0, 1) == "/") // Absolute path?
    {
        return getRealUrl("http://" + document.domain + filePath);
    }

    // Otherwise, assume relative path.
    return getRealUrl("http://" + document.domain +
        getAllButFilename(document.location.pathname) + filePath);
}

// Takes a file path as a 'full' URL (including 'http://' and domain) and
// yields a 'real' version of it with no '.' and '..' parts.
function getRealUrl(fullUrl)
{
    var protocolAndDomain = fullUrl.substr(0, fullUrl.indexOf("/", 7));
    var urlPath = fullUrl.substr(protocolAndDomain.length + 1);
    var urlPathParts = urlPath.split("/");
    var realPath = "";
    var parentCount = 0;

    for (var i = urlPathParts.length - 2; i >= 0; i--)
    {
        if (urlPathParts[i] == ".")
        {
            continue;
        }

        if (urlPathParts[i] == "..")
        {
            parentCount++;
            continue;
        }

        if (parentCount > 0)
        {
            parentCount--;
            continue;
        }

        realPath = urlPathParts[i] + "/" + realPath;
    }

    return protocolAndDomain + "/" + realPath +
        urlPathParts[urlPathParts.length - 1];
}

Conclusion

My own feeling about the final implementation is that it seems like an awful lot of code for adding a ‘mere’ include feature to a language, even if it is one that seems to be fairly comprehensive. I could have made the code shorter, of course, but only at the expense of making it either flakier or less flexible and powerful (unless we’re talking about just removing all unnecessary whitespace). If you’re prepared to put up with the limitations of the code presented in the first article, for example, then clearly it could be shorter, but only the fuller version presented here offers anything like the equivalent feature available in other languages.

Only time will tell whether I make use of my own new facility (and, in any event, it will need further testing and/or use before I’ll be satisfied that it is fully reliable with no lingering bugs), but at the very least, I’ve found that the journey has been interesting, and there are a few useful little functions and code snippets that, quite apart from forming part of the final ‘include’ implementation, may be useful in their own right. I can imagine, for example, that the algorithm used by the ‘getRealUrl()’ function for parsing the ‘.’ and ‘..’ bits from pathnames may in itself turn out to be useful one of these days.

Anyway, as ever, I’m open to your constructive comments and thoughts. And thanks for reading.

JavaScript Include, Part 2

In this second article about developing a JavaScript ‘include’ facility, I’ll deal with the handling of inclusion paths so that included source files can include other source code using paths that are relative to themselves, rather than relative to the page containing the ‘<script>’ element that made the ‘include()’ code available initially. (If you’ve not seen the previous article or you need a reminder, please take a look at my first JavaScript ‘include’ article.)

Update: JavaScript Include, Part 3 article has now been published. Continue reading “JavaScript Include, Part 2”

JavaScript/HTML Synchronous and Asynchronous Loading

To complement my previous article about implementing a JavaScript include facility, I’m taking a closer look at the default behaviour of JavaScript and HTML (including HTML5) with respect to synchronous and asynchronous loading of script files (among other things). If you’ve ever wanted to include script files within an HTML page in an asynchronous way, or you’ve wanted to load a file synchronously using JavaScript, this article may well be of use to you.

Disclaimer

As included in the first JavaScript include article, I invite you to read my disclaimer. It still applies, and constructive comments are welcome on any gaffes or oversights.

Synchronous to Asynchronous

When a JavaScript source file is included in a web page via HTML’s ‘<script>’ tag, the loading of the included file is performed to completion before any more of the including page is rendered/executed. That’s what synchronous loading is.

For the most part, synchronous loading is a useful way to operate for included JavaScript code files, and it seems likely that, even if most beginner JavaScript programmers are largely unaware of the whole sync/async situation, they will develop web pages happily making the (perhaps unknowing) synchronous-loading assumption.

A common case is when including a library of functions for use within the current page, as in the following snippet:

<script type="text/javascript" src="usefulLib.js"></script>

<script type="text/javascript">
    usefulFn(); // Function from 'usefulLib.js'.
</script>

It seems sensible to expect that, by the time we get to the call to ‘usefulFn()’, that ‘usefulLib.js’ (including the code for ‘usefulFn()’) would have fully loaded. In fact, it would be a nuisance if we couldn’t rely on this being the case. Imagine if, at the whim of the browser, or other happenstance, it was sometimes the case that ‘usefulFn()’ wasn’t available to call after ‘usefulLib.js’ had been requested for inclusion.

Sometimes, however, we may specifically want JavaScript source files to load asynchronously, i.e., for our including page to carry on rendering/executing while at the same time loading the specified included file. Alternatively, we may wish to include a JavaScript source file only after the including page has finished loading. This may be handy for files from external sources where we don’t want our including page to suffer the consequences of: slow connection speeds, heavily loaded external servers, or waiting for timeouts on external servers that aren’t even there at the moment.

For these cases, the HTML ‘<script>’ element has the ‘defer’ and ‘async’ attributes (the latter introduced in HTML5). In short, ‘defer’ requests that the loading of the specified file occurs after the including page has finished loading, and ‘async’ requests that the loading of the specified files occurs concurrently with (or, at least, independently of) the including page.

These attributes may be used in a similar manner to any HTML attributes, e.g.:

<script type="text/javascript" src="usefulLib.js" defer></script>
<script type="text/javascript" src="usefulLib.js" async></script>

Sync to Async Example Code

To see the ‘defer’ or ‘async’ attributes in operation, create a separate JavaScript source file (let’s call it ‘busy.js’) containing the following code:

var startNow = new Date();
var pauseFor = 5000; // In milliseconds.

while (new Date() - startNow < pauseFor)
    ;

This code causes JavaScript to go into a busy 'while' loop until at least a certain number of milliseconds have elapsed (in the code above, it's 5000 milliseconds, or five seconds).

Having saved this JavaScript file, create an HTML page containing the following:

<html>
<head>

<script type="text/javascript" src="busy.js"></script>

<script type="text/javascript">
alert("Time's up");
</script>

</head>
</html>

If you browse to this page, you should experience a five-second pause after which the 'Time's up' alert box will pop up. This shows that, by default, the HTML '<script>' tag loads and runs the specified source file to completion before proceeding with rendering/executing the including page.

Now tweak the first of the '<script>' lines above to include the 'async' attribute, like this:

<script type="text/javascript" src="busy.js" async></script>

If, after this edit, you refresh the page (and assuming you have a browser that supports HTML5), you should see the 'Time's up' alert pop up immediately, while the 'busy.js' code runs independently.

JavaScript's Asynchronous Behaviour

Because of the danger of poor performance, JavaScript itself tends to favour asynchronous working, generally avoiding synchronous behaviour. As an example of this tendency (and as a exercise to the reader with a little spare time) try to find a means of having JavaScript perform a blocking wait or sleep. (To repeat: that's a blocking, not busy, wait, so I don't mean a 'while' loop like the one in my 'busy.js' example that keeps your processor busily running for five seconds.) If you find a nice way for JavaScript to perform blocking wait, do let me know.

To see JavaScript's default asynchronous behaviour, create a new HTML page containing the following code:

<html>
<head>

<script type="text/javascript">
function loadJavaScript(filePath)
{
    var headElement = document.getElementsByTagName("head")[0];
    var newScriptElement = document.createElement("script");
    newScriptElement.type = "text/javascript";
    newScriptElement.src = filePath;
    headElement.appendChild(newScriptElement);
}

loadJavaScript("busy.js");
alert("Time's up");
</script>

</head>
</html>

This is essentially the programmatical equivalent of an HTML '<script>' tag. As you can see, I've provided a JavaScript function that finds the containing page's '<head>' element, and dynamically adds to it a new 'text/javascript'-type '<script>' element that has a 'src' attribute of a supplied value. Having defined this function, I call it with the name of the 'busy.js' source file we used earlier, then pop up the 'Time's up' alert box.

If you browse to this page (and you created the 'busy.js' script file earlier), you will see that the 'Time's up' message pops up immediately, showing that, unlike the HTML version we saw previously, JavaScript's default behaviour is asynchronous.

Synchronous File Loading in JavaScript

As we've already established, there are good reasons for generally favouring asynchronous behaviour. Putting the rendering of your web page on hold waiting for some external file to load (which may be on another server on the other side of the world, and which may not even be available at the moment) isn't always the smartest move. Sometimes, however, being able to (for example) load a file synchronously is just what's required.

I recently encountered such a case in implementing a source-code inclusion facility in JavaScript (which you can read about in my first JavaScript Include article).

In this case, I resorted to the use of AJAX to read (and include) the contents of source files synchronously for precisely the same reasons that the HTML '<script>' tag defaults to being synchronous: because I want to be able to rely on included code being available to me immediately after including it.

Here's a synchronous version of the previous example:

<html>
<head>

<script type="text/javascript">
function loadJavaScriptSync(filePath)
{
    var req = new XMLHttpRequest();
    req.open("GET", filePath, false); // 'false': synchronous.
    req.send(null);

    var headElement = document.getElementsByTagName("head")[0];
    var newScriptElement = document.createElement("script");
    newScriptElement.type = "text/javascript";
    newScriptElement.text = req.responseText;
    headElement.appendChild(newScriptElement);
}

loadJavaScriptSync("busy.js");
alert("Time's up");
</script>

</head>
</html>

This snippet should work fine (and, if it doesn't, see the 'Note About Local Files' below), but it's pretty pared down: it has no error checking and other fail-safes. For a more bullet-proof implementation of synchronous JavaScript file reading, I invite you to see one used as part of the first JavaScript Include article I mentioned earlier.

A Note About Local Files

For security reasons, some browsers (and it's amazing that it's not all browsers) won't allow the reading of files using the 'file:///' protocol in AJAX. If you're having difficulties (specifically seeing messages like 'XMLHttpRequest cannot load file:///...' in your JavaScript console), you'll need to access the code via HTTP, i.e., via the use of a web server, instead of just double-clicking your example pages (or equivalent means of quickly loading them into your browser).

Improved Include

Just as a further comment to my previous JavaScript Include article, it is still my intention to write further include-related articles to overcome the issues identified with the first include implementation presented there.

JavaScript Include

Many languages offer a facility for allowing one source code file to gain access to other source files. Although JavaScript files can be included from within an HTML page (using the HTML ‘<script>’ element with an appropriate ‘src’ attribute), JavaScript itself has no capability for including one JavaScript source file from another.

In this article, I’ll take a first look at developing such a feature, along with possible future developments of the facility.

Update: JavaScript Include, Part 2 article has now been published.

Further update: JavaScript Include, Part 3 article has now been published.

Disclaimer

It may seem like a strange thing to admit at this stage, but JavaScript isn’t really my thing. Although I’ve tinkered with JavaScript for many years, it’s been a rather on-and-off affair, and somewhat more off than on. Because of this, please prefix everything I say here with something like ‘As far as I can tell…’ or ‘It seems to me…’ or equivalent.

I have tried to make a reasonable attempt to avoid writing garbage, but please do feel free to constructively comment on any misconceptions or other gaffes I might have made.

What’s Include?

In short, I’m aiming to produce a feature that would allow the JavaScript developer to use something like the following within their JavaScript code:

include("useful.js");

After such a directive, all code within ‘useful.js’ (functions or what have you) would be available for use.

As JavaScript doesn’t support such a feature, there’s a Catch-22: If we were to be able to develop the code to provide an ‘include()’ facility, how would a JavaScript source file be able to gain access to it when there’s no way to include other JavaScript source code?

There are only two ways I can think of to proceed (if you can think of others, do let me know):

  1. Every JavaScript source file must contain a copy of the code to provide ‘include()’, or
  2. Every HTML page (or page template) must contain an appropriate ‘<script>’ element to ‘include’ the separate ‘include()’ source file (‘include.js’, say).

Out of the two, the second seems the least bad to me. It’s likely that JavaScript is almost exclusively used as part of web developments, so JavaScript code only gets to run because it’s invoked, in one way or another, from a web page.

Assuming that you feel okay about adding a line like the following to each of your web pages (or templates), then we’re on our way:

<script type="text/javascript" src="include.js"></script>

How to Implement Include

Using JavaScript, it’s possible to add ‘<script>’ elements programmatically to the current document, something like this:

// A first attempt at 'include()'.
function include(filePath)
{
    var headElement = document.getElementsByTagName("head")[0];
    var newScriptElement = document.createElement("script");

    newScriptElement.type = "text/javascript";
    newScriptElement.src = filePath;
    headElement.appendChild(newScriptElement);
}

This function will kind of work, but there’s a problem. In general, JavaScript interpreters (such as the one built into your browser) try to load web content asynchronously, so the loading of the file named by ‘filePath’ above will be handled separately from the execution of the ‘include()’ code. This means that the named file won’t necessarily have been loaded by the time the ‘include()’ function returns. So, if the included file contains a ‘usefulFn()’ function, for example, calling it as follows may result in an error indicating that the function has not been found:

include("useful.js");
usefulFn();

The asynchronous loading of separate files can, it seems, be sidestepped by writing a copy of the included code into the body of the ‘<script>’ element itself, something like this (this line to be used instead of the ‘newScriptElement.src’ line in the first attempt):

newScriptElement.text = "function usefulFn() { alert('usefulFn'); }";

Therefore, it seems as if all we need to do is replace the literal string of code in this last line with a bit of JavaScript to read the contents of the file to be included and assign it to ‘newScriptElement.text’, and we’re there… However, JavaScript hasn’t traditionally been keen to allow you to read files at all, and even now that file handling support has been included as part of HTML5, such facilities are geared up to working with files asynchronously… so it would seem that we’re back to Square 1.

We’re so close, though. All we need is some way to synchronously read file contents, and, fortunately, AJAX provides a means:

var req = new XMLHttpRequest();
req.open("GET", filePath, false); // 'false': synchronous.
req.send(null);
// All being well, content of 'filePath' now in 'req.responseText'.

When you ask how to read a file (or, indeed, do anything) synchronously, pretty much all self-respecting JavaScript programmers will ask you why you want to do it before they reveal the answer (assuming they reveal it at all). This is because JavaScript is generally asynchronous for a reason. After all, nothing stops a loading website in its tracks quicker than trying to synchronously read a file from a remote server that’s not there at the moment. However, with care (used only on relatively small, local files, for example), synchronous operation can sometimes represent a good solution to a problem.

We now have pretty much all we need to have a go at producing a proper ‘include’ implementation.

Proper Implementation of Include

So far, the code presented has been pared down (with no error checking or other fail-safes) and somewhat fragmentary. Here’s an attempt to put the principles together into something more comprehensive and sturdy; an example ‘include.js’:

// Essentially 'new XMLHttpRequest()' but safer.
function newXmlHttpRequestObject()
{
    try
    {
        if (window.XMLHttpRequest)
        {
            return new XMLHttpRequest();
        }
        // Ancient version of IE (5 or 6)?
        else if (window.ActiveXObject)
        {
            return new ActiveXObject("Microsoft.XMLHTTP");
        }

        throw new Error("XMLHttpRequest or equivalent not available");
    }
    catch (e)
    {
        throw e;
    }
}

// Synchronous file read. Should be avoided for remote URLs.
function getUrlContentsSynch(url)
{
    try
    {
        var xmlHttpReq = newXmlHttpRequestObject();
        xmlHttpReq.open("GET", url, false); // 'false': synchronous.
        xmlHttpReq.send(null);

        if (xmlHttpReq.status == 200)
        {
            return xmlHttpReq.responseText;
        }

        throw new Error("Failed to get URL contents");
    }
    catch (e)
    {
        throw e;
    }
}

function include(filePath)
{
    var headElement = document.getElementsByTagName("head")[0];
    var newScriptElement = document.createElement("script");

    newScriptElement.type = "text/javascript";
    newScriptElement.text = getUrlContentsSynch(filePath);
    headElement.appendChild(newScriptElement);
}

Once this has been placed into its own file, it can be referred to in your pages/templates in the same way as any JavaScript source file, e.g.:

<script type="text/javascript" src="include.js"></script>

Are There Any Problems?

As it stands, yes. If I were to ‘include()’ a source file from within another included source file, I’d want and generally expect to be using a directory path that’s relative to where the including source file resides. For example, if I were to keep all my JavaScript source in the ‘http://www.example.com/js’ directory on my site, then, within ‘js/include1.js’, I would want to use the following call to include ‘js/include2.js’:

include("include2.js"); // Relative to the including source file.

However, if ‘js/include1.js’ was itself included from ‘http://www.example.com/index.html’, then the paths passed to ‘include()’ would have to be relative to that page in order to work, i.e.:

include("js/include2.js"); // Relative to the original including page.

This means that, unless you keep all your pages and source files in one directory (which I’m sure you don’t, and wouldn’t want to), JavaScript source files would need to know the directory in which the including page resides in order to get the relative pathnames to other source files right. This isn’t ideal: What if the source file is included from two pages residing in different directories, for example?

What About Include-Once?

In addition to include, many languages offer an include-once facility. Where many files are variously dependent upon other files and upon each other, it’s easy to see how the same files could be included repeatedly. Include-once would prevent such multiple inclusions of the same file by only including each file the first time it’s encountered.

From the caller’s point of view, an include-once feature would be similar to using ‘include()’, e.g.:

includeOnce("useful.js");
usefulFn();

Including Local Files

For security reasons, some browsers (and it’s amazing that it’s not all browsers) won’t allow the reading of files using the ‘file:///’ protocol in AJAX. If you’re having difficulties (specifically seeing messages like ‘XMLHttpRequest cannot load file:///…’ in your JavaScript console), you’ll need to access the code via HTTP, i.e., via the use of a web server, instead of just double-clicking your example pages (or equivalent means of quickly loading them into your browser).

Future Articles

It is currently my intention both to present a solution to the relative pathname issue, and to write about an implementation of ‘includeOnce()’ in future articles.

Update: JavaScript Include, Part 2 article has now been published.

Further update: JavaScript Include, Part 3 article has now been published.

Configuring LESS on Mac OS X and PhpStorm 6.0

LESS is a neat library that extends CSS with dynamic behaviour. It is not the only tool of its type but I like it as it is fairly quick to configure. I tend to build HTML projects as a quick front end to some code. LESS gives me a quick way of making changes to style. PhpStorm 6.0 provides file watchers that run LESS in the background and compiles CSS while you work. This very brief tutorial will help you get things going on Mac OS X Mountain Lion.

Configuring Node.js

If you have LESS installed, skip this section. You need node.js installed, including the node package manager (npm). Download and run the installer package. Accept the default options. If you have installed Xcode in the past then your development environment will have already configured your shell to contain the correct paths. The installer package will prompt you if you need to update your shell path to include the location of npm. By default, at the time of writing, npm is installed at /usr/local/bin/npm. Confirm this by running the which command:

$ which npm
/usr/local/bin/npm

Once npm is installed, open a terminal window and run the following command to install LESS.

$ npm install less -g

If you experience problems during the installation, my security options required sudo to be used and that allowed the installation to proceed, it may be the case for you too. Once the installation has completed, confirm the presence of lessc using which.

$ which lessc
/usr/local/bin/lessc

Try it out by passing a simple .less file through the compiler.

$ lessc example.less > example.css

You should be good to go with LESS.

Configuring PhpStorm / WebStorm

File watchers are a great feature in the JetBrains web IDEs. As you edit LESS files, Php/WebStorm will automatically compile them and produce CSS files in your project. You may get prompted to add a file watcher when editing a LESS file. Responding affirmatively is the simplest way of enabling the file watcher. If you missed it, select Preferences from the application menu. Select File Watcher from the ‘Project Settings’ section.

Configuring a File Watcher using PhpStorm 6.0

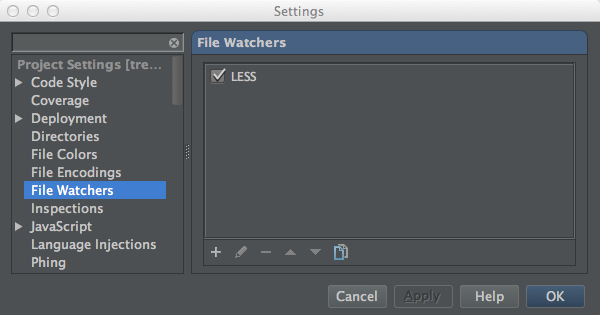
If you responded to the auto-detect LESS prompt, there will be a file watcher already listed, as shown in the screen shot. If you are configuring for the first time, select the + icon and choose LESS.

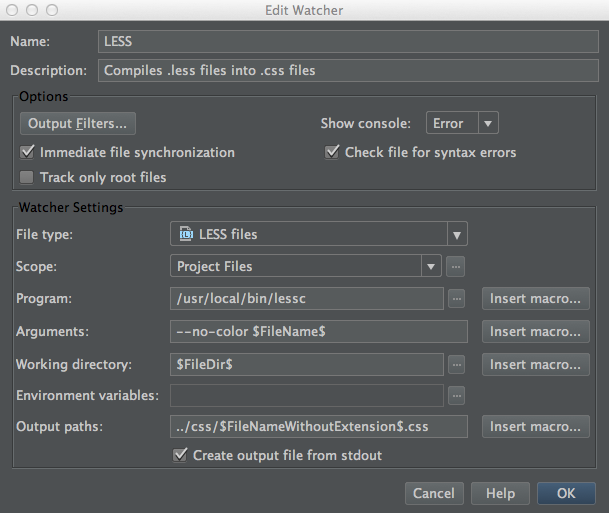
Editing file watcher settings using PhpStorm 6.0.

PhpStorm should detect the installation of lessc automatically. Additionally, there are some useful settings in the dialog. The ability to track root files only is great when working with Twitter Bootstrap projects; when you only desire bootstrap.less to be compiled in response to changes in variables.less. A full description of the options is available in the JetBrains documentation.

That is all there is to it. Any time you edit a LESS file, the IDE will compile it using the settings configured in the file watcher.

Further Reading

Models without Tables in CakePHP

CakePHP provides a lot of functionality. If you follow its naming conventions and practices as outlined in The Book, you get the functionality without having to write a lot of plumbing code. The worked examples walk you through the basics of creating a CRUD application. The problem I have with CRUD applications is I am not convinced that they exist. I have never been tasked with creating an application that merely creates, updates and deletes data. There is always a reason to collect the data and often this reason will result in some processing, which may be reports, operations, monitoring etc.

Linking models to tables and establishing their relationships is useful and, as already mentioned, quite powerful. In this article I suggest that you have all of those models in place and have them implement any methods that are required, but supplementing those models with table-less models when an operation involves multiple modes and contextually different validation rules. I think this approach presents a few benefits, chiefly:

  • Methods that act on data are situated in the model layer.
  • Validation rules that are specific to an operation can be separate from the associated table model.
  • Controllers remain skinny.
  • Take advantage of CakePHP view form and validation mechanisms without involving the controller.

Define The Model

The first step is to create a new file to define your model, ensuring that it inherits AppModel. For the purpose of this tutorial, I have appended Operation to the class name for table-less models. You will most likely have your own naming convention/company style. The useTable member of the class should also be initialised to false. This stops some of the CakePHP functionality from activating, scanning your database and declaring a schema. You will do this manually.

class ContactOperation extends AppModel {
	public $useTable = false;
}

You will then need to declare a schema member (inherited from base class). You will define it with your own ‘table’ definition. This is a regular CakePHP array (string keys of arrays). You can use this to create fields that will represent the aggregate data that you wish to collect. This data depends on your scenario. For example, if your program managed windshield repairs, you may have models for operatives, customers, vehicles, stock and appointments. A wind shield repair gathers information, from your CRUD generated features, and does something with it. An operative will fix the windshield on a given appointment, which takes place at a particular place. These operations may trigger historical event logging, stock allocation and other activities – all things pertaining to the relevant models. However, the fix windshield operation may only need to collect a set of information consisting of key fields from other models, a date/time and other notes. It does not get saved to the database directly, it is used to execute lots of other activities. The scenario could also be much simpler, like a contact form. The contact form does not have a model directly related, but it will still validate email addresses, possibly check for rogue IP addresses or some white/blacklist mechanism. All these scenarios present an opportunity to wrap them up into a model, instead of fragmenting the context over several. For the purpose of this article, the contact form is the scenario of choice. Define the schema within the class as shown:

public $_schema = array(
        'name' => array(
            'type' => 'string',
            'length' => 200,
            'null' => false,
        ),
        'email' => array(
            'type' => 'string',
            'length' => 150,
            'null' => false,
        ),
        'category_id' => array(
            'type' => 'integer',
            'null' => false,
        ),
        'message' => array(
            'type' => 'text',
            'null' => false,
        ),
    );

With a schema and known fields in place, you are already on your way to being able to use the form helper to generate input for this model automatically in your views. To this end, we shall now add some validation rules. The validation rules are defined as another associated array, just like a regular model. You can use a combination of built-in CakePHP rules or use your own custom rules.

public $validate = array(
    'name' => array(
        'validName' => array(
            'rule' => array('between', 2, 200),
            'message' => 'Name must be %s-%s in length.',
            'allowEmpty' => false,
            'required' => true,
        ),
    ),
    'email' => array(
        'validEmail' => array(
            'rule' => array('email'),
            'message' => 'Must be a properly formatted e-mail address.',
            'allowEmpty' => false,
            'required' => true,
        ),
    ),
    'category_id' => array(
        'validCategory' => array(
            'rule' => array('validateCategory'),
            'message' => 'Must represent a valid category.',
            'allowEmpty' => false,
            'required' => true,
        ),
    ),
    'message' => array(
        'validation' => array(
            'rule' => array('notempty'),
            'message' => 'Message cannot be empty.',
            'allowEmpty' => false,
            'required' => true,
        ),
    ),
);

I have provided the validation rules in long form. It is something I tend to do when developing with CakePHP for my own code consistency. The only custom validation rule is that of category ID. In this simple example, the categories will be a static array list provided by the model being defined. A real application would likely retrieve these categories from a specific data provider. That being said, the validation method and a get list method are presented below, add them to your ‘ContactOperation’ model definition.

public function getCategoriesList() {
        // this could be a find 'list' from
        // another model
        return array(
            1 => 'Sales',
            2 => 'Support',
            3 => 'Query',
        );
}

public function validateCategory($check) {
        // would likely check for a real
        // record id
        $selected = reset($check);
        return is_numeric($selected) &&
            $selected < 4 && $selected > 0;
}

Additional rules can be added according to your preference. You may have a banned list of e-mail address, in which case a validation rule could verify the existence of the address on this list and behave accordingly. This list may be external to your application. The methods shown here are illustrative of the framework in operation. I am certainly not suggesting you adopt it as ‘good practice’.

Defining the Controller

You have choices when defining the controller. You could provide a specific controller for the purpose of contact form operations. You could create a method in an existing controller and create a route for it. I shall use the example given in DerEuroMark’s blog post on the Contact Form Plugin. Define a new controller called ‘ContactController’ and have it extend ‘AppController’. E.g.

<?php
App::uses('AppController', 'Controller');

class ContactController extends AppController {

    public $useModel = false;
}

The ContactController will only have one method, index. Using this naming scheme allows for an easy browse to /contact/ without requiring specific routes to be configured. The controller is set to not use a model directly, they can be initialised at execution time as required. The definition of the index method is given as:

public function index() {

    $model = ClassRegistry::init('ContactOperation');

    if($this->request->is('post')) {
        $model->set($this->request->data);
        if($model->validates()) {
            $this->Session->setFlash(_('Thank you!'));
            // do email sending and possibly redirect
            // elsewhere for now, scrub the form
            // redirect to root '/'.
            unset($this->request->data);
            $this->redirect('/');
        } else {
            $this->Session->setFlash(_('Errors occurred.'));
            // display the form with errors.
        }
    }

    $categories = $model->getCategoriesList();

    $this->set('categories', $categories);
}

This method is very simple. The controller checks to see if the request is a post and attempts to validate the form. Upon successful validation, it’s time to send an email, say thanks and do whatever is required after using the contact form. Should the form not validate, it will use the view form helper to tie into the validation errors and have the displayed side by side with the input controls, the usual CakePHP affair. The model is initialised at the start of the method using the ClassRegistry static class. Before the view is rendered, the categories are assigned to the view from the model method you defined earlier. This is regular CakePHP naming convention and ties the list with the input control and remembers user selection.

Define the View

The view is a simple form, with several input controls. The form creates a ‘ContactOperation’ form, which hooks up to the model and retrieves the appropriate mark up settings. It really is very simple. Create a new directory under ‘View’ called ‘Contact’ and a file within it called ‘index.ctp’. Use the following markup/script to define your view:

<div class="contact form">
    <?php echo $this->Form->create('ContactOperation'); ?>
    <fieldset>
        <legend><?php echo __('Contact Us'); ?></legend>
        <?php
            echo $this->Form->input('name');
            echo $this->Form->input('email');
            echo $this->Form->input('category_id');
            echo $this->Form->input('message');
        ?>
    </fieldset>
    <?php echo $this->Form->end(__('Submit')); ?>
<?php
echo $this->Form->end();

Start your development server (my screen shots show MAMP running on localhost:8888) and navigate to /contact. You will see something similar to the screen shot:

CakePHP Contact Form View

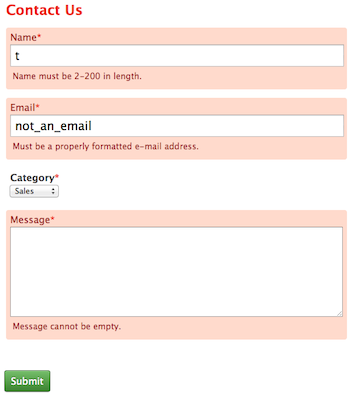
If you put some data into the inputs that purposefully trip the validation methods, you can see how CakePHP has automatically hooked your model logic into your view.

CakePHP Contact Form View with Errors

Summary

The technique demonstrated in this post can be used in most business scenarios. I often find the table-less model approach to be much cleaner and less muddled than trying to pin a multi-model operation onto one model and managing the relationships. Using a table-less model, you get to define your behaviour and validation within the context of the operation, while maintaining the stand alone validation.

To extend this idea, you can then implement the save methods inherited from model, or write your own application level method. For example, the code to send an email could be presented as a method in your ContactOperation model. For something more general, such as this contact form, you may wish to produce a set of plugins and tools for use across various projects.

Further Reading

PhpStorm and CakePHP Unit Tests

I am currently crafting a brief tutorial on testing using PhpStorm, CakePHP and my recent experiences in running a project with this setup. However, running CakePHP unit tests from within the PhpStorm IDE was driving me to despair until Maarten Balliauw came to my rescue. He has made a blog post explaining how to hook the PhpStorm and CakePHP unit tests together. I can verify that it works well and I have run hundreds of tests. If you are working with CakePHP and PhpStorm, you should read Maarten’s post.

The folks at JetBrains really are a classy bunch!

Configure PHP on Mac OS X Mountain Lion

I have recently picked up a project to be created using PHP. It has been great to get back into PHP as I have not used it in a while (since PHP 4.3). For some reason, web sharing was removed from OS X Mountain Lion; removing the one click activation of Apache. PHP is still there and can be configured easily from the terminal. This post explains how to activate PHP, Pear and Xdebug using the system installation.

For convenience, I recommend using a separate stack for development, such as MAMP. I shall post about that later.

Install Xcode

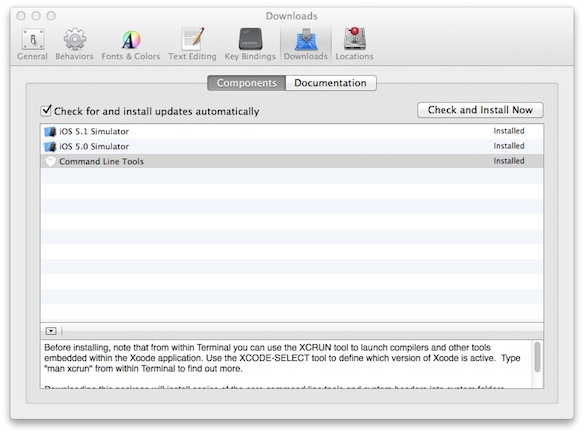
If you intend to develop on your Mac then I recommend installing Xcode from the App Store. Once you have Xcode installed, launch the program and go to preferences. Click on the Downloads tab install the Command Line Tools. This will make compilers available, such as gcc, for building extensions and packages.

Xcode Preferences
Additional downloads for Xcode.

Configure PHP

Use the default initialisation file and copy it to the same directory as ‘php.ini’. You will need to provide your administrative account password for sudo commands.

$ sudo cp /private/etc/php.ini.default /private/etc/php.ini

You should now be able to execute php with the -v switch to get the current version and determine that it is installed.

Configure Pear

Execute the Pear PHP archive using the following:

$ sudo php /usr/lib/php/install-pear-nozlib.phar

Point Pear and Pecl programs to the PHP initialisation file:

$ pear config-set php_ini /private/etc/php.ini

$ pecl config-set php_ini /private/etc/php.ini

Finally, get Pear to upgrade itself and all of its packages.

$ sudo pear upgrade

Install and Configure Xdebug

From the terminal prompt, get Pecl to install Xdebug.

$ sudo pecl install xdebug

Pecl will install Xdebug as an extension and create a new line in your php.ini file referencing the extension. This will not work correctly as Xdebug needs to be loaded as Zend extension. This can be corrected with a brief and simple change to php.ini.

$ sudo pico /etc/php.ini

Change the line at the top that starts with ‘extension’ to:

zend_extension="/usr/lib/php/extensions/no-debug-non-zts-20090626/xdebug.so"

Save php.ini and you should now have a working PHP with Xdebug using Mountain Lion.